
If you’ve been looking to use your iPhone or iPad as a single, universal remote control for all your audio and video devices, you’ve probably been frustrated by what’s been available. Even as more and more manufacturers—including major A/V brands like Onkyo, Marantz, and Denon—have been releasing apps to control their equipment, things haven’t gotten simpler. Instead, they’ve become riddled with switching apps and oftentimes lack of full functionality found in the real remote.
The major home automation companies like Crestron, Savant, and Control4 (among others) transitioned their mature and robust remote control systems to the iPad and iPhone years ago. Unfortunately, you need to pay a custom installer to program any of those systems—and it can run you into the thousands of dollars just for custom programming.
If you’ve been an enthusiast and wanted to do things yourself then Logitech’s Harmony line of remotes have been the staple, go-to. However, if you’ve wanted to use your smart phone or tablet to control your audio or video equipment, Logitech’s offerings have been sub-par at best. So in today’s day and age, isn’t there something out there that works and works well?
The answer is yes, and it’s called “Roomie Remote”. Roomie Remote promises to succeed where so many have failed: be a true, activity-based universal remote control system that is powerful, flexible, and easy-to-use. How well does Roomie fair? Well, let’s take a look below.
Purchasing and Configuration Options
Roomie Remote is available for any iOS-based device. That means you can run it on an iPhone, iPad, or iPod Touch. Android and Blackberry users are out of luck. The Roomie Remote software can be downloaded directly from the Apple App Store.
The one complaint I have about Roomie Remote is that what you need up front is not as clear as it could be (you need to read all the footnotes). In fact, it can get confusing and even frustrating for the first time user. So let me help here.
If you download and install Roomie, it will only control two devices—specifically only devices that can be controlled via a network. Unless you have a brand new TV and brand new receiver, in the majority of cases, the basic Roomie Remote app won’t meet your needs and you’ll need to upgrade to one of two configurations, which I’ll outline later below. I’m going to make an assumption that you will likely either:
- Use your iPhone or iPad as a traditional infrared (IR) remote by pointing with an adapter connected to the device or
- Use your iPhone or iPad over a WiFi network and have another device convert the signal to infrared (IR).
Configuration 1: Using Roomie as a point and control IR Remote –Total Cost $72.88 (or $82.87 with HT Guide Pack).
- Roomie Remote App (this is the app itself plus 2 devices) $9.95
- Home Theater Pack (this allows you to control more than 2 devices) $19.99
- Infrared Control Pack (allows you to control devices using traditional IR) $9.99
- L5 Universal Remote Accessory (allows your device to transmit IR signals via this adapter) $32.95
- As an option, you can also purchase the HD Guide Pack for $9.99, which will add the ability for you to access control your iTunes library, Sonos, or VLC directly from Roomie.
Configuration 2: Using Roomie over WiFi and converting signals to IR with an external gateway $144.88 (or $154.87 with HD Guide Pack).
- Roomie Remote App (this is the app itself plus 2 devices) $9.95
- Home Theater Pack (this allows you to control more than 2 devices) $19.99
- Infrared Control Pack (allows you to control devices using traditional IR) $9.99
- iTach IP to IR Adapter. This adapter takes Roomie’s signal from a WiFi network and converts it to IR or serial commands. Depending on your home network needs, adapters range from $89.99 to $104.95.
- As an option, you can also purchase the HD Guide Pack for $9.99, which will add the ability for you to access control your iTunes library, Sonos, or VLC directly from Roomie.
Determining Device Compatibility
If you have any doubts or questions whether or not your device(s) are supported, Roomie Remote maintains a fairly expansive list of supported devices here: http://www.roomieremote.com/ip-compatibility/ From this list, you can check and see if your device can be directly controlled over IP, over IR, or via serial. You can also see if the live feedback options is available to you for IP or serial connections.
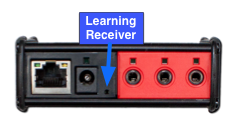  |
| You learn an IR command via the Global Caché external adapter’s IR learning receiver port. |
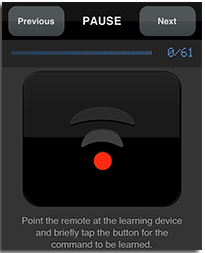 |
| Roomie gives you visual confirmation that you have learned an IR command |
If you don’t see a device listed, you can always train Roomie to learn all the IR commands of the device by following the very simple steps Roomie has here: http://www.roomieremote.com/faq/#learnir
Installation
 |
| The iTach ethernet to IR adapter is a small device that converts the Roomie Remote’s WiFi to IR. I chose the ethernet version, however there is also a WiFi version that will simply connect to your WiFi network making placement easy and flexible. |
 |
| The iTach comes with all the IR adapters you will need, including a blaster, which will send a ‘blast’ of IR signals. You can only use the IR blaster on the third port of the iTach, and you must explicitly tell the iTach via its web interface that you are using a blaster on the third port. |
I configured the first IR port to control my Marantz receiver, the second IR port to control my Oppo Bluray player, and used the third port with the “IR Blaster” adapter to control my remaining devices in my cabinet, which included my AppleTV, cable box, and VCR.
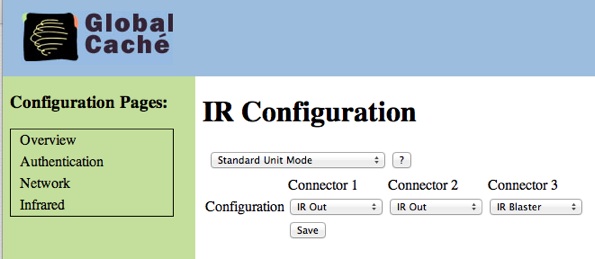 |
| You configure the iTach adapter via your web browser. It’s very easy. If you are connecting the IR Blaster, you must explicitly set the blaster in Connector 3 (port 3) or it will not work. |
One important note is that the IR Blaster is only supported on the third port of the iTach. Because the blaster requires a bit more power and can toast one of the regular IR adapters, you need to explicitly configure the third port to support the blaster.
Tech Note: If you’ve never used an IR extender or blaster before, it’s initially intimidating but very easy. The IR extender is a cable that plugs into the back of the iTach and then at the other end has a small “eye” with double-stick tape. You simply affix the eye portion onto the IR receiver of your device. This then sends the IR signal directly to that device. Most devices will indicate where the IR receiver is with a small “IR” label. If you don’t see such a label, you can easily find the IR port by shining a flashlight onto the face of the component you want to control. If you ever get stuck, Roomie Remote support is there to walk you through the process.
So, with my components all connected with the iTach, I was all set to give Roomie a full run for its money.
Setup
Roomie Remote is very, very powerful yet you are immediately presented with a simple and easy-to-understand interface. Roomie works along the following four concepts or levels. Roomie’s interface is designed across these levels. Once you understand these, the rest is easy.
- Rooms: First, Roomie Remote works on the concepts of “rooms”. This is very logical, because we normally control devices in a particular room. So Roomie wants to know what room you’ll be in and controlling.
- Devices and Activities: Roomie then wants to know what devices are in a particular room (for example, TV, receiver, BluRay player, AppleTV. It will then configure activities based on those devices (for example, “Watch TV” or “Watch BluRay movie”, etc.).
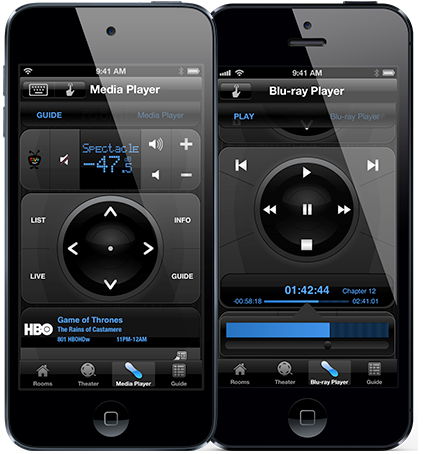
- Remote Control: Based on the activity, Roomie will then build a custom remote control with all the buttons necessary for you to navigate that activity. What’s incredibly cool is that this custom remote will integrate commands across any number of remotes. So, for example, if you use your Samsung TV as the display, your Oppo Bluray for the movie source, and your Marantz receiver as the audio, it will build a central remote that has the buttons to control all three devices instantly!
- Guide: The guide is active only if you are accessing iTunes or a TV programming guide.
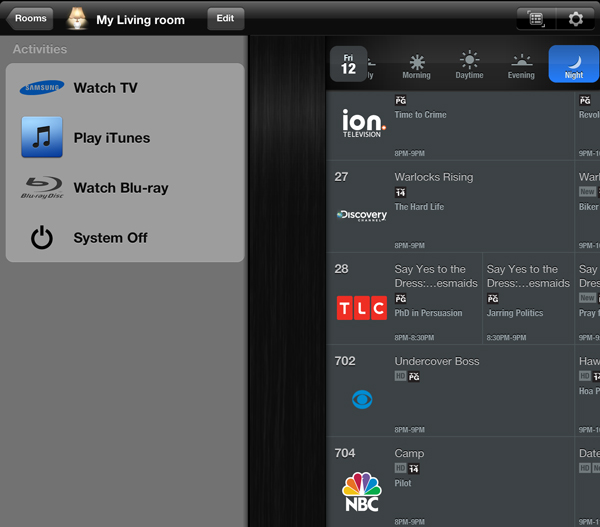
 |
| In the “Living Room” Roomie configured the activities, with the custom-remote, and guide. This is a good example of the room, activity, remote, and guide layers that Roomie Remote operates along. |
Setting up Your Rooms in Roomie
The first thing you need to do is define the rooms you want to setup. Setting up a room is simple: you give the room a name and choose an image to represent that room.


Adding and Configuring Devices in Rooms
Next, you setup the devices in that room that Roomie will be controlling. To add a device in a particular room, you simply press on “Add Device…”.

If the device is controlled via IR, you’ll first select Global Caché iTach from the screen and then the IR port on the iTach that the device is connected to. As you see from the screenshot below, the process is visual and intuitive.


It’s important to note that the order in which you add devices is important. You should always start with your display or TV first, followed by your receiver and then all the source devices.
Tech Note: Starting with your TV and receiver first are very important because these two devices normally support the video and audio for all the source devices. If you don’t add these first, you will then have to go back and add them manually for each activity.
Once you add your devices, you’ll be prompted to add an activity for that device. An activity is simply a smart way of taking all the remote control commands from all the different remotes and combining them together so that when you want to “Watch a Movie” Roomie will know to turn on your TV, turn on your receiver, and turn on your Bluray player automatically without you having to fumble through different remotes or screens or issue multiple commands. Just pressing the activity does it all.

If, for some reason, one of your devices is not listed in Roomie’s extensive database then you can have Roomie Remote “learn” the IR commands of that particular device’s remote. In other words, you can create custom devices to meet any of your needs.
A Note about iTunes

 |
| The first time you try and link Roomie to your iTunes library, you’ll be prompted to enter an authorization code in iTunes to let Roomie connect to that iTunes library. |
Using Roomie: Performance and Overall Impressions

 |
| Integration with the Roku was slick and refreshing. |
 |
| Blue lets you know that Roomie successfully communicated a particular command to a device. |
 |
| In this example, Roomie failed to set my receiver to input TV4. What was the reason for the failure? I turned off WiFi on my iPad! |
I didn’t run into any issues with Roomie during my tests except for one: I had turned WiFi off. Because Roomie requires a WiFi network, if you go out of range or turn off WiFi on your device, Roomie will be unable to issue commands. Thankfully, if Roomie senses that your WiFi is turned off, it will let you know!
Backing up your Roomie Configuration
- Backup via iTunes
- Email yourself a copy of the configuration file
- Backup to DropBox
Conclusion and Bottom Line

 review: The perfect audiophile streaming speaker")


 and Edge NQ network streamers gain Roon support")


 and Edge NQ network streamers gain Roon support")
 review: The perfect audiophile streaming speaker")
